How to Create Effective Content Calendars in Google Sheets for Streamlined Content Planning
Content calendars are an essential tool for marketers and content creators to plan, organize, and track their content production and distribution strategies. While there are various tools available for creating content calendars, Google Sheets is a powerful and versatile option that offers easy collaboration, accessibility, customizability, integration with other tools, and cost-effectiveness. In this article, we will guide you through the process of creating effective content calendars in Google Sheets, providing step-by-step instructions and helpful tips to elevate the design and functionality of your calendars.
Why Use Google Sheets for Content Calendars?
Google Sheets may not be the first tool that comes to mind when you think of creating a calendar, but it offers several compelling reasons to use it for content calendar management:
- Easy Collaboration: Google Sheets makes it exceedingly easy to collaborate with team members. By creating a calendar in Google Sheets, you can share it with your team and allow everyone to contribute and make updates in real-time. This ensures that everyone is on the same page and can stay organized and informed.
- Accessibility: With Google Sheets, your calendar is accessible from anywhere with an internet connection. Whether you’re at the office, working remotely, or on the go, you can easily access and update your calendar on any device. This flexibility ensures that you are always up-to-date and can make changes as needed.
- Customizability: Google Sheets offers a range of formatting and design options to make your calendar fully yours. You can choose different colors, fonts, and styles to make your calendar visually appealing and easy to navigate. This level of customization ensures that your calendar aligns with your team’s branding or reflects your unique style.
- Integration with Other Tools: Google Sheets seamlessly integrates with other Google tools, such as Google Calendar and Google Drive. This means that you can easily sync your Google Sheets calendar with your Google Calendar, and you can also link to and organize relevant files and documents within the spreadsheet, keeping everything in one centralized location.
- Cost-Effective: One of the biggest advantages of using Google Sheets as a calendar tool is that it’s free. This is particularly important for small businesses or individuals who may not have the budget for a dedicated calendar tool.
Now that we understand the benefits of using Google Sheets for content calendars, let’s dive into the step-by-step process of creating one.
Step 1: Setting Up Your Content Calendar in Google Sheets
To create a content calendar in Google Sheets, follow these steps:
- Open a new spreadsheet: Start by opening a new Google Sheets document. You can do this by going to sheets.google.com and clicking on “Blank” or selecting a template that suits your needs.
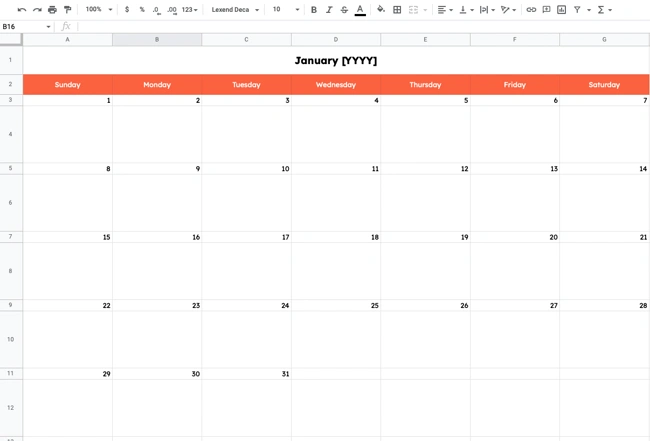
- Choose your month: In the first cell of your spreadsheet, enter the name of the month you want to create a calendar for. For example, if you’re creating a calendar for January, enter “January” in the first cell.
- Format your calendar: Format your calendar by merging cells and applying formatting options. You can merge cells to create larger spaces for headers or to group days of the week together. Experiment with different formatting options to make your calendar visually appealing and easy to read.
- Add days of the week: In the next row, enter the names of the days of the week (e.g., Sunday, Monday, Tuesday, etc.) in separate cells. You can do this manually or use a formula to populate the days of the week automatically.
- Fill in the dates: Starting from the first day of the month, fill in the dates in the corresponding cells below the days of the week. You can do this manually or use a formula to populate the dates automatically.
- Add additional columns: Depending on your content calendar needs, you may want to add additional columns to track different elements, such as content topics, authors, deadlines, or distribution channels. Insert new columns as needed and label them accordingly.
- Customize the design: Customize the design of your calendar by applying formatting options, such as changing font styles, colors, or adding borders. Make sure the design reflects your brand or personal style.
Step 2: Populating Your Content Calendar
Once you have set up the basic structure of your content calendar, it’s time to start populating it with content-related information. Here are some key elements to consider:
- Content topics: Enter the titles or topics of your planned content pieces in the corresponding cells. This will help you visualize your content strategy and ensure a balanced distribution of topics throughout the month.
- Content types: If you produce different types of content, such as blog posts, videos, or social media posts, create a column to indicate the content type for each piece. This will help you diversify your content and ensure a mix of formats.
- Authors: If you have multiple authors or contributors, assign each piece of content to the respective author by entering their names in the corresponding cells. This will help you keep track of who is responsible for each piece and ensure a fair workload distribution.
- Deadlines: Set deadlines for each piece of content by entering the due dates in the corresponding cells. This will help you stay organized and ensure timely delivery of your content.
- Status: Create a column to track the status of each piece of content, such as “In progress,” “Draft submitted,” “Under review,” or “Published.” This will help you monitor the progress of your content production and distribution process.
- Distribution channels: If you have specific distribution channels for your content, such as your blog, social media platforms, or email newsletters, create a column to indicate where each piece of content will be published. This will help you plan your content distribution strategy and ensure a consistent presence across different channels.
Step 3: Collaborating and Sharing Your Content Calendar
One of the major advantages of using Google Sheets for content calendars is the ease of collaboration and sharing. Here’s how you can collaborate and share your content calendar with your team:
- Share with collaborators: Click on the “Share” button in the top right corner of your Google Sheets document. Enter the email addresses of your team members or collaborators and choose their level of access (e.g., edit, comment, or view only). This will allow them to contribute and make updates to the content calendar in real-time.
- Set permissions: If you want to restrict access to certain parts of your content calendar, you can set specific permissions for different collaborators. For example, you may want to give your team members editing access to the content details but limit their access to the design elements. This can be done by selecting the cells or ranges you want to protect and adjusting the permission settings accordingly.
- Enable notifications: To ensure everyone stays informed about updates and changes in the content calendar, enable notifications for your collaborators. This will send email notifications whenever someone makes changes or adds comments to the document.
- Track changes: Google Sheets allows you to track changes made by different collaborators. You can access the “Version history” feature under the “File” menu to see a log of all changes made to the document and revert to previous versions if needed.
Step 4: Enhancing Your Content Calendar Design
While the functionality of your content calendar is crucial, a visually appealing design can make it even more effective and user-friendly. Here are some tips to enhance the design of your content calendar in Google Sheets:
- Color coding: Use colors to visually distinguish different types of content, authors, or status of each piece. For example, you can assign a different color to blog posts, videos, or social media posts to make it easier to identify them at a glance.
- Conditional formatting: Apply conditional formatting rules to highlight important dates or deadlines. For example, you can set up rules to automatically change the background color of cells containing overdue or upcoming deadlines.
- Formatting fonts and styles: Experiment with different font styles, sizes, and formatting options to make your content calendar visually appealing and easy to read. Use bold or italic text for important information or headers to make them stand out.
- Adding images or icons: Consider adding relevant images or icons to your content calendar to make it visually engaging. For example, you can insert icons representing the different content types or use images to represent specific events or holidays.
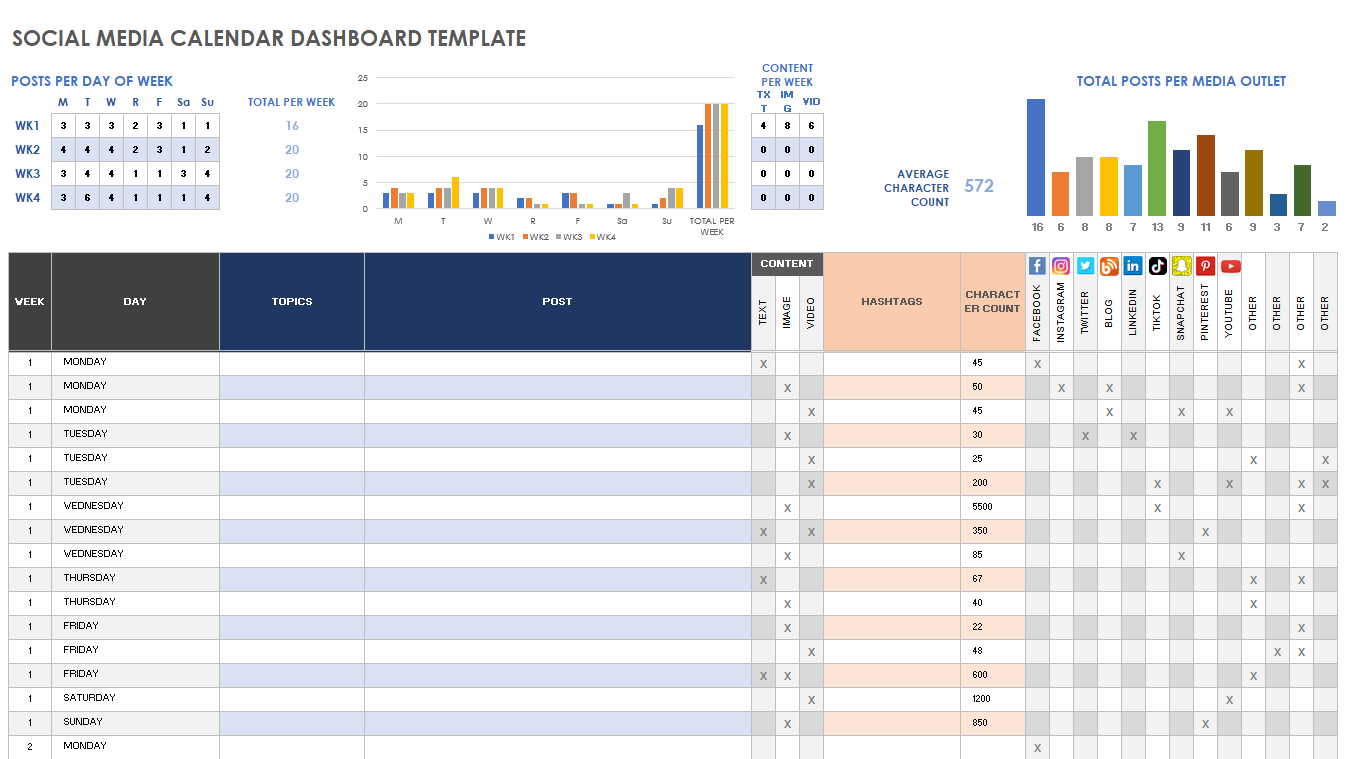
- Creating charts or graphs: If you want to track and visualize key metrics or performance indicators related to your content, you can create charts or graphs within your Google Sheets document. This will provide a quick overview of your content performance and help you identify trends or patterns.
Step 5: Integrating Your Content Calendar with Other Tools
Google Sheets seamlessly integrates with other Google tools, allowing you to streamline your content management process. Here are some ways to integrate your content calendar with other tools:
- Google Calendar integration: Sync your Google Sheets content calendar with your Google Calendar to ensure that all important dates and deadlines are reflected in your personal or team calendars. This will help you avoid scheduling conflicts and stay organized.
- Google Drive integration: Link to relevant files and documents within your Google Sheets content calendar using Google Drive. This will help you keep all related assets in one centralized location and easily access them when needed.
- Task management tools integration: If you use task management tools like Asana, Trello, or Monday.com, you can integrate your content calendar with these tools to create tasks or assign deadlines directly from your calendar. This will help you streamline your workflow and ensure that all tasks are completed on time.
Step 6: Using Templates for Content Calendars
If you don’t want to start from scratch, you can use pre-designed templates for content calendars in Google Sheets. Templates provide a ready-made structure and design that you can customize to suit your specific needs. Here are some template options:
- Editorial Calendar Template for Google Sheets: This template is designed specifically for editorial planning and covers all your content needs. It includes columns for dates, content topics, authors, deadlines, and other relevant information. You can easily customize it to fit your editorial strategy.
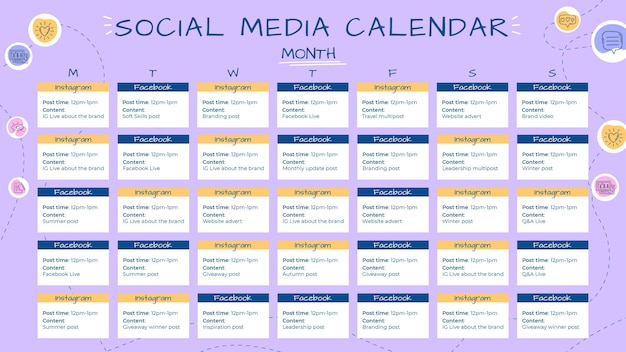
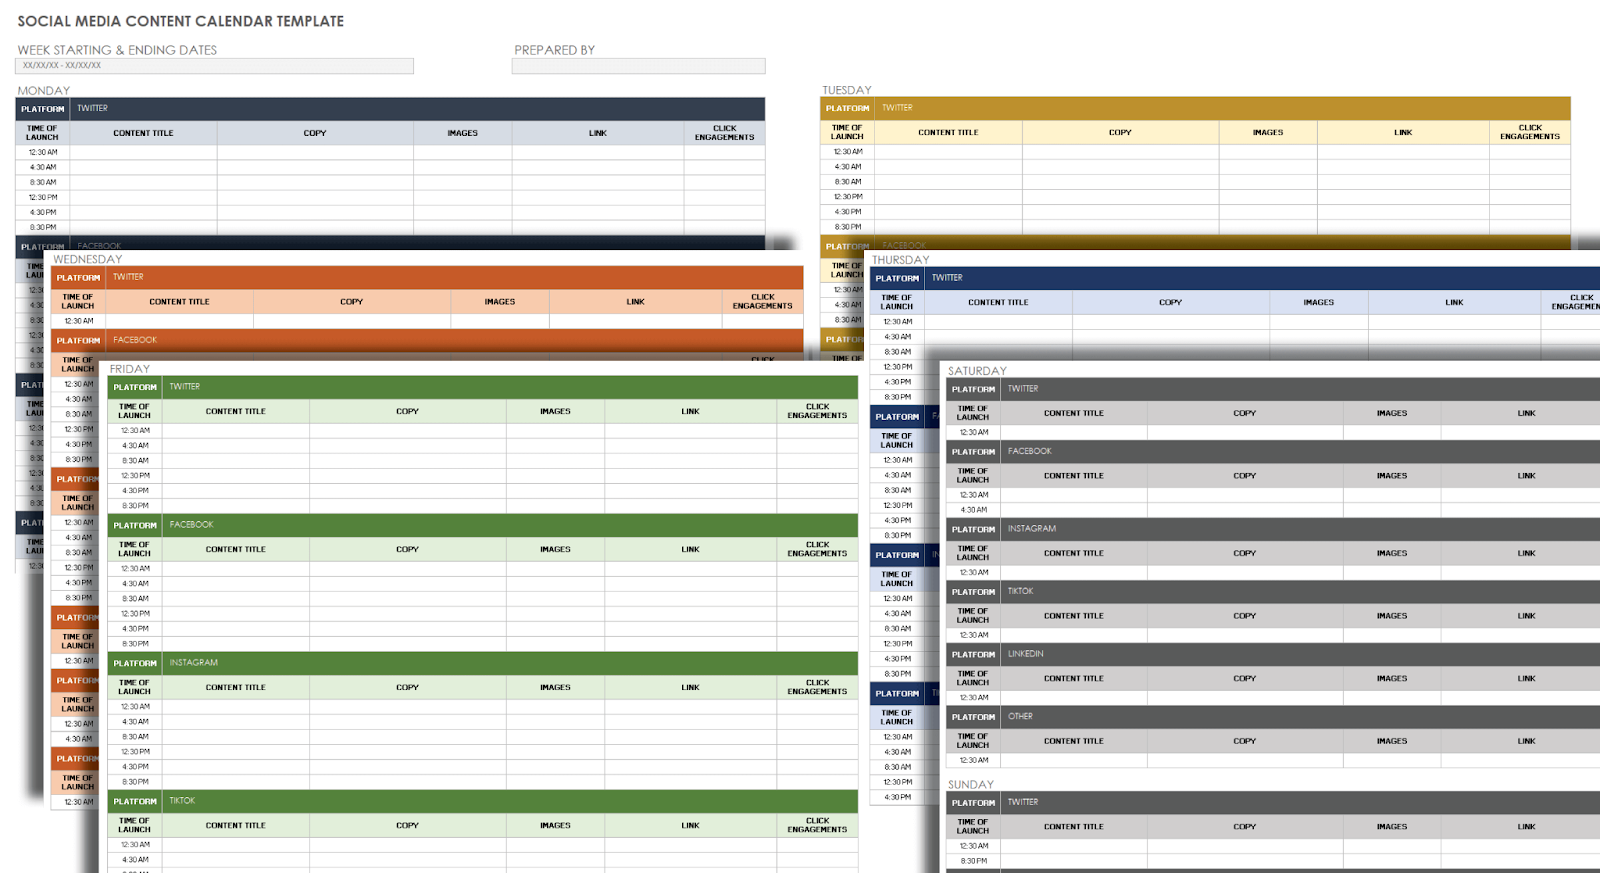
- Social Media Content Calendar Template for Google Sheets: If you focus on social media content planning, this template is ideal. It includes columns for dates, content captions, platforms, and other social media-specific details. You can adapt it to your social media strategy and easily track your content across different platforms.
Remember to choose a template that aligns with your content goals and customize it according to your specific requirements.
Conclusion
Creating effective content calendars is essential for successful content planning and management. Google Sheets offers a powerful and versatile platform for creating, collaborating, and sharing content calendars. By following the step-by-step process outlined in this article and applying the tips and best practices provided, you can create content calendars that are visually appealing, well-organized, and easy to manage. Start using Google Sheets for your content calendars today and take your content strategy to the next level.